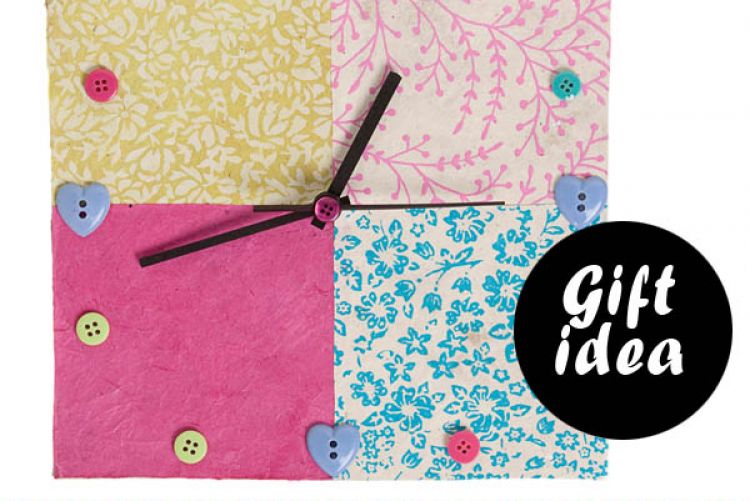

Clocks make ideal homemade Christmas gifts. You can make them in loads of different shapes and colours tailored to your loved one’s taste. They’re cheap and not too time consuming and best of all you don’t have to be too good with your hands to make them. You can pick up supplies easily by dismantling an old clock or buying one from a euro shop.
Supplies
- Clock hands
- Buttons x 12
- Clock Set
- Cardboard box
- Coloured paper x 4 (Daintree Paper, www.daintree.ie )
- Glue
- Scissors
- Pencil
- Ruler
- Skewer
Difficulty Rating: Easy
Time: 10 minutes
Cost: €6
- Start by dismantling an old clock or one you got from a Euro Shop. Separate hands from clock set so that you’re left with the minute, hour and second hand separate from the clock body at the back.
- Using your ruler draw a square measuring 15cm on each side onto your cardboard box. Cut out three of these squares and each one on top of each other. This is now your clock face.
- Divide your clock face into four sqaures and mark the centre where they all meet – this is where the spoke of the clock set will come through
- Taking your coloured paper draw four sqaures matching the four smaller squares on the clock face. You can use four different papers. Cut out your four squares from the paper. These squares are for the front of the clock.
- Using one of your four papers draw another square to match the shape of the clock face. This square is to cover the back of the clock.
- Now take your skewer and make an incision through the centre point of the clock face that you marked earlier. Make sure that you have a clean incision and that the hole can be accessed from front through to back.
- Glue each of your small squares onto the front of your clock face using the lines you drew earlier as your guide.
- Glue on the larger square of paper onto the back of the clock face. Using your scissors trim off any excess paper.
- Take your clock set and put the spoke through the back of the clock so that it comes through to the face of the clock. Next you need to screw on the hands – you place the minute hand on first, then the hour and then the second. Screw everything titghtly and the entire set will hold itself together without needing glue.
- Finally glue on your buttons – using larger ones for 12, 3, 6 and 9. Insert the battery into the back of the clock and set the time!